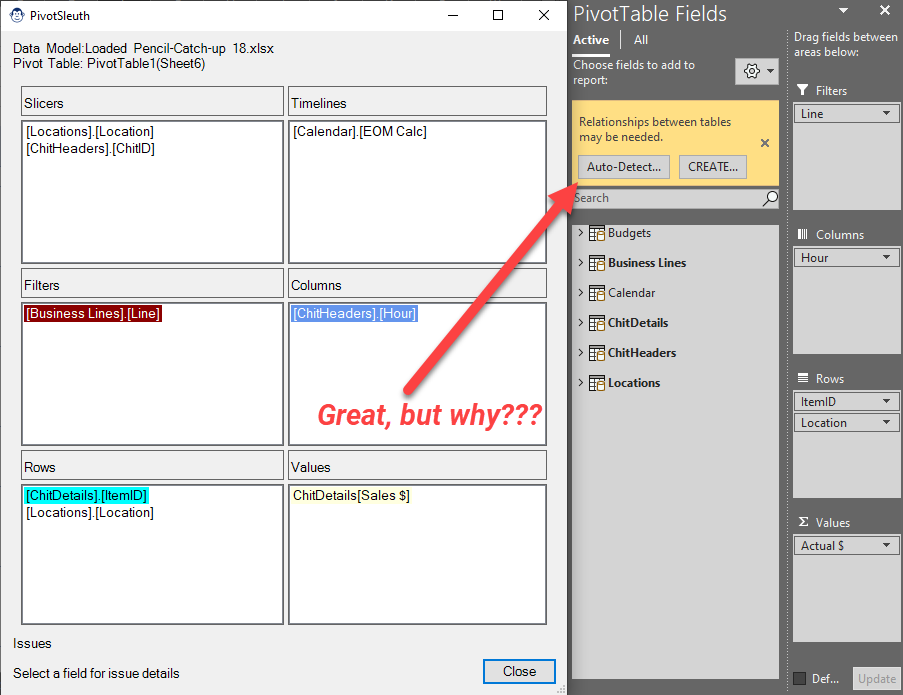
Monkey Tools

QuerySleuth

Article Overview

Query Sleuth is one of our smartest Monkeys.  Not only does it allow you to review, edit and indent the M code for any (and all) of your queries, it doesn’t lock you out of interacting with Excel like the Power Query Editor does.

Another fantastic feature that this Monkey delivers is the ability to trace and step through related queries which can be displayed to show Precedents of Dependents.  It even highlights precedent queries in the M code itself!

If you need to understand how your queries are related, and enjoy doing a little M code tinkering, we’re sure that you are going to love this little animal.

In this article, we’ll explore exactly what the QuerySleuth does, as well as how to use it.

The QuerySleuth User Interface

The QuerySleuth form was designed to address several shortcomings in Power Query’s “View Dependencies” feature (not the least of which that it was several clicks away from the Excel canvas). In our opinion, that feature was unusable with large volumes of queries, so we needed to design a better view for tracing query relationships in our models.

The QuerySleuth is packed with information, as you can see in the image here. Some of the key things to be aware of in this window:

This lists the model name, allowing you to see which file QuerySleuth is currently displaying.

This lists the time the QuerySleuth last queried Excel or Power BI to get the model details.

Shown at left, this “tree view” lists all queries with their dependencies or precedents as determined by the selection in “Display Related Queries” at the bottom of the form. (The default is to show Precedents.)

This is the large area on the right side of the screen. It is fully editable and shows you a large portion of information about your query. This area is discussed in more detail in the section on Controlling the Query Navigator.

At the bottom of the form are a variety of configurable options to help you get the most out of the form, each of which is discussed below.  Please keep in mind that many of these options are disabled on a Free license!

Controlling the QuerySleuth Query Navigator

The purpose of the Query Navigator is to show how individual queries are related to each other. There are three options for this area of the form, each of which are controlled via the radio buttons in the “Display Related Queries” section of the Options area (at the bottom left of the form). These options work as follows:

Choosing this setting means that Monkey Tools will scan the model and show all precedents that feed the selected query. This view is very useful for figuring out the entire chain of queries that fed your data model or Excel table. Also, this can be a useful view to trace back and figure out where you eliminated a key piece of data.

The Dependents view shows all queries that depend on the selected query. This can be useful for figuring out what queries you may affect if you change a given query.

Setting the option to “Off” will still list each query in the Query Navigator but will not show +/- buttons for dependent or precedent queries at all.

As QuerySleuth is non-model (unlike the Power Query window, Monkey Tools will allow you to interact with Excel), it means that you could potentially change queries in Excel while the QuerySleuth is open. To bring QuerySleuth back in sync with your file, you may want to refresh the Power Query model, which can be done by clicking the “Refresh” button.

One thing that isn’t readily apparent from looking at the form is that you can expand an entire Query Navigator node’s precedents or dependents by double clicking on that node. It’s just a little feature that makes it super easy to drill into the query you want to examine!

Understanding the Formula (M Code) Window

The M code window is the heart of understanding what your query does, and we’ve added loads of features to make this easier to understand. In addition, you should know that the code here is fully editable and can even be written back to Excel by clicking the “Update” button at the bottom of the form.

Full M Code Indentation

By default, we indent your M code (although you can turn this off in the options below). When you read your code, you’ll see that the step name is indented by one tab, and the formula begins indented on the next row. Our general rule of thumb is to indent anything between pairs of (), [], or {}, except in certain cases as defined by our indentation algorithm.

Syntax Highlighting

While our syntax highlighting doesn’t match Power Query’s editor exactly, it’s pretty close, and will hopefully help you understand your code a little bit better. One thing we do that the Power Query editor doesn’t, is that we highlight precedent query names so that you can see not only that they are a precedent, but also what type they are (as defined by the colour coding options for the Query Navigator).

The selected query show above is then Calendar query. In the Query Navigator, we can see that this query has two precedents: EndDate and StartDate. Given that EndDate is shown in green, we know that this query loads to the data model, while StartDate is yellow, and is only loaded as a connection.

But now move to the M Code window. Notice how the StartDate query (shown by the 2) has a yellow background, matching the view from the Query Navigator? In addition, EndDate (shown by the 1), has a green background. Even without the numbers on the M code window, you’d have to agree that this makes it very easy to scan the query and recognize anything that is coming from another query.

These options can, of course, be toggled via the M Code Options listed at the bottom of the form.

Editing Queries with QuerySleuth

The Formula windows supports editing and writing back to Power Query, without ever opening the Power Query editor.

Editing Individual Queries

To make your edits, simply type over any test that you wish to replace, and choose “Update”. This will write your updated query back to the workbook.

Editing Multiple Queries

When you edit a query, and then move to another query in a session of QuerySleuth, you’ll be asked if you’d like to discard the changes. If you say no, we “pin” your query, allowing you to make changes to multiple queries. (You can also choose to pin your query by clicking the pin button at the top of the form.)

Saving Changes

If you have a pro license, you can save your query modifications by clicking the Update button.  What happens then depends on the state of the “Force Refresh” button:

  • If ‘Force Refresh’ is checked, the changes are saved, and the query will be refreshed immediately.
  • If ‘Force Refresh’ is un-checked, the query changes will be saved, but a refresh will NOT be triggered.

Understanding the QuerySleuth Options

Display Options

The Display Options control how the Query Navigator displays the queries. It is also worth noting that Monkey Tools saves your most recent selection as a default, so it preserves your preferred view every time you open the form.

To learn more about each individual option, expand the arrows shown on the right.

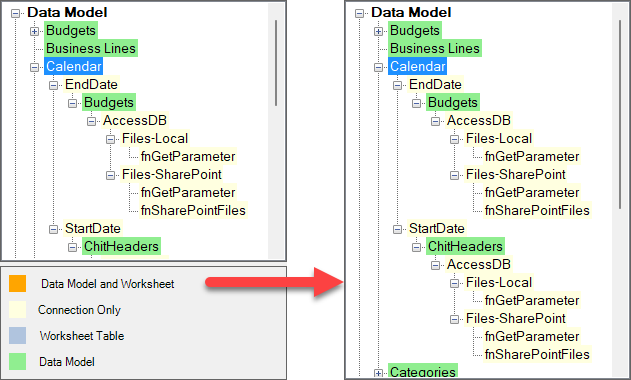
Unchecking the Collapse All checkbox will collapse all queries back to the main heading levels as shown here:

Of course the nodes can still be expanded by clicking on the + button.

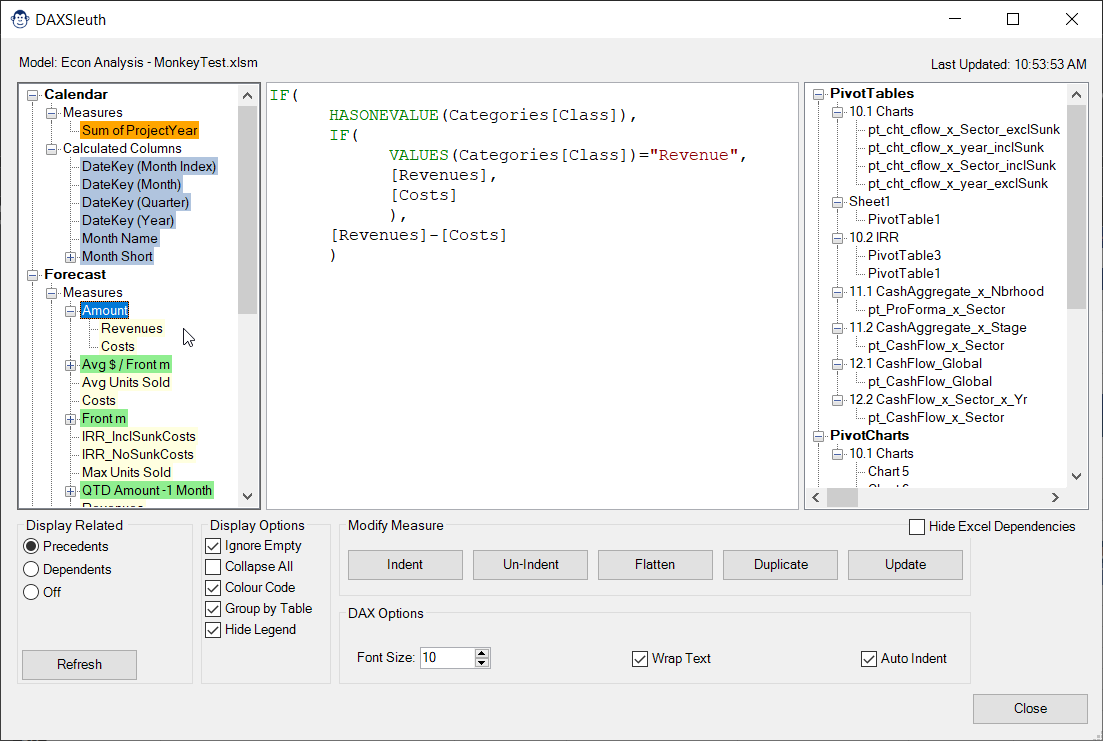
By default, the queries are all colour coded as follows:

  • Yellow: Query is loaded as a Connection Only
  • Green: Query is loaded to the data model
  • Blue: Query is loaded to an Excel table
  • Orange: Query is loaded to both the data model and an Excel table

This option suppresses any queries which have no precedents or dependents (as determined based on the “Display Related Queries” choice). A sample of the difference can be seen here:

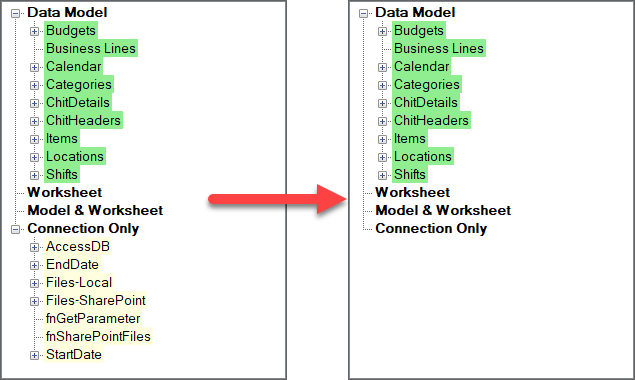
The key takeaway from this view is that all the Connection Only queries are used to feed other queries in the model. If they weren’t, they still show up in the Connection Only section. This can be a very useful setting for eliminating noise, as well as tracing Connection Only queries that are not used at all (and can therefore be eliminated from the model).

Toggle ContentWhile the legend is useful for understanding the query load destinations, it does take up a lot of space. Once you understand what the colours mean, it’s helpful to suppress, which you can do by unchecking the box. We also save this selection as your default, so you won’t have to un-check the box every time you load QuerySleuth.

M Code Options

The M Code Options area allows you to toggle several features that you may or may not want active in the M code window at any given time, as well as update your queries when you are ready to do so.

It is important to realize that QuerySleuth displays your M code indented by default, even if it is not indented in the actual Power Query source code. For that reason, we provide three display options:

  1. Indented: our default view, displaying indented and beautified M code.
  2. Current: displays what you’d see if you opened the query in Power Query’s Advanced Editor.
  3. Un-indented: forcing the code back to the un-indented format.

If the M code window is “too colourful” for you, you can turn this feature off by unchecking this box.

The Font Size controls allow you to scale the font size in the M code window. You can manually enter your desired font size in the box or use the arrow keys to scroll it up and down to find the size you prefer.

The Wrap Text feature is on by default but doesn’t really have much of an impact unless you turn the M indenting feature off.

This checkbox forces Power Query to refresh a query as soon as you save a change. Clearing it will let you save changes, and then leave it up to you to manually refresh to get any updated data.

Discard any changes to the active and/or pinned queries you have modified in the current QuerySleuth instance.

The last option on this form is the Update button, which allows you to write the current query’s state back to the Excel file. It is important to be aware that the display on in the Monkey Tools M code window has nothing to do with how the query is contained in Excel’s query formula. To prove this, look at one of your queries in the QuerySleuth, then edit the query, go to the Advanced Editor, and compare the results. It’s a good bet that they’ll look different.

If you’d like to update them to be the same, or if you made any tweaks to the query in order to get it right, you can click the Update button to write the updated query (or queries) back into the Excel file. It’s as simple as that!

Watch a Live Demo of the QuerySleuth in Action

Ken demonstrated the abilities of the QuerySleuth for the KSA Excel user group.

Share:

Facebook
Twitter
LinkedIn

Related Posts

DMVSleuth

Coming Soon! Sorry, but this article isn’t quite ready yet. We promise that we’re working on it! In the mean time – until we get

ModelSleuth

Coming Soon! Sorry, but this article isn’t quite ready yet. We promise that we’re working on it! In the mean time – until we get

DAXSleuth

Coming Soon! Sorry, but this article isn’t quite ready yet. We promise that we’re working on it! In the mean time – until we get

PivotSleuth

Coming Soon! Sorry, but this article isn’t quite ready yet. We promise that we’re working on it! In the mean time – until we get

TimeSleuth

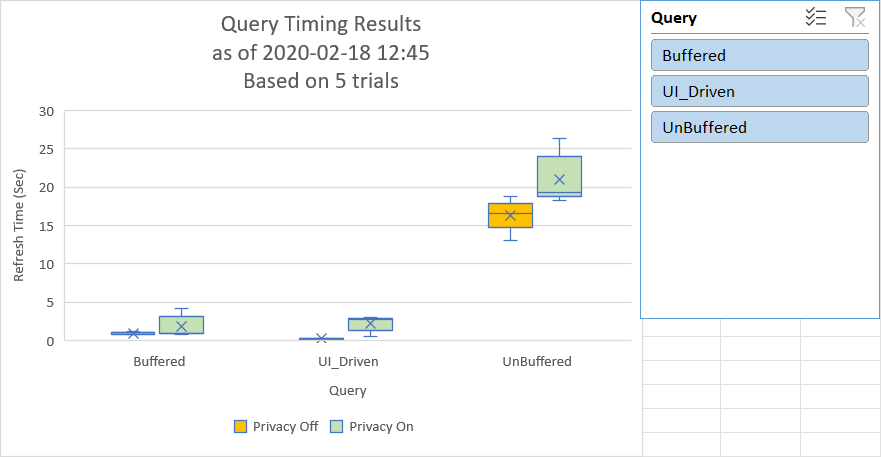
Article Overview One of the realities of building complex models is that we build models which take a long time to refresh. While timing with